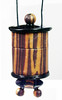
 This month, Penni Jo Couch will be showing us how to make a **Faux Zebrawood Inro** using polymer clay.
* When: Saturday, May 10, 2008, 1:00 – 4:00 p.m.
* Where: The new Hobby Lobby in Norman, 2417 W. Main, Norman, OK. (The classroom is up front, near the check stands. Go right after entering & it’s the first door on the right.)
* What to Bring:
* Strong Polymer Clay: **Please** have your clay conditioned before class and use only a strong brand of clay for this project. The Faux Zebrawood inro pictured uses 1/2 block gold, 1/4 block of dark brown and 1/2 block of black. For the inside, metallic clay is nice as it is bright when the box is opened. Gold may be very soft, so you may want to mix it 50/50 with translucent for the inside.
* Paper, scotch tape, scissors
* Cord: like 1 mm or 2 mm rolled leather cord or other heavy cord
approx. 1/16” in diameter. The drill bit will need to be about the same diameter as your cord.
* Hand drill with 1/16” drill bit in a handle.
* Blades: Exacto knife with new, sharp blade. Rigid tissue blade or razor blade for straight cuts.
* Pasta machine or Acrylic roller and spacers
* Deli paper or wax paper: The deli or wax paper is needed to prevent the clay from sticking to your work surface.
* Poly-fill, small amount to stuff inside the inro.
* Liquid clay – Kato or TLS.
* Release Agent: Baby powder or cornstarch and a small brush for applying OR Kato Repel Gel.
* Brushes: Small brush dedicated to liquid polymer clay. (No need to clean it out. It can be stored in a baggie between uses.)
* Thin, stiff wire or needle to make holes in the beads.
* Baking Surface – Small (4” by 4” or 2” by 2”) tile or heavy cardboard. Remember, we share the ovens at guild so bring something just larger than your project so that many can be put into the oven at the same time.
* Varnish – Future or other polymer clay friendly varnish.
* Optional Items: Extruder to make the ropes that go around the box, under the lid and above the bottom. Closure if you wish for the necklace to separate in the back.
* Optional Embellishments: Canes – Assortment of canes, Pearl Ex or other mica powders, Mokume Gane slices, or other faux finishes.
As this is a fairly involved class with specialized supplies, Penni Jo has put together a kit that has some of the necessary items for $1.00 each. She needs to know in advance which members want the kits so she can have these prepared. **Please reserve a kit via our mailing list.** If you’re not on the mailing list, you can also use contact form.
**Inro Kit Contents** (available from Penni Jo for $1):
* 1 1/4” tall PVC pipe form with paper taped around it, bottom clipped and ready to use.
* 1/4” Paper strip for cut line
* Small piece of paper for patterns
* Tiny bag of baby powder for release agent
* Tiny bag of liquid Kato Medium®
* Two sheets of Deli Paper
* Small amount of Fiber-fil®
* Toothpicks, two cut in half, ready to use
* Full color lesson with pictures.
If you would like a sneak peak at what we’ll be doing, check out these PDFs from Penni Jo:
* InroMaterialsList.pdf
* InroClassInstructions.pdf
It’s going to be an exciting meeting — we hope to see you there!