Skip to content

Meeting Announcements

March 2016 Meeting: Owl Earrings with Deb Hart

  • by

DebHartOur next meeting will be Saturday, March 12, 2016 from 1:30-4:30 p.m. in the Contemporary Arts Center at the fairgrounds.

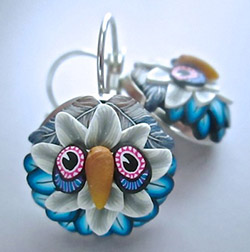
We are delighted to welcome Deb Hart as our special guest teacher for the March guild meeting. She will show us how to make these adorable sculpted owl earrings using canes.

There’s a LOT of information about Deb and this project in the attached PDF file. In preparation, be sure to make the two bullseye canes ahead of time that are listed OwlEarringsunder “Materials” in the PDF.

This is also raffle month, so bring your goodies if you won something in the last one!

February 2016 Meeting: Snowflake or Flower LED Pendant

  • by

Our next meeting will be Saturday, February 13, 2016 from 1:30-4:30 p.m. in the Contemporary Arts Center at the fairgrounds.

Rescheduled from last month: Lori Luli will show us how to make a blinking snowflake pendant and flower pendants, incorporating LED lights for a high-tech effect. Lori will have lights available for the pendant. (For non-members, there will be a charge for lights and battery).

Materials:

Clay needed:

  • Translucent, 1/2 block
  • White or very pale blue, 1/2 block
  • Liquid clay
  • For a snowflake-ish pendant
    – Blue-ish clay (for snowflake background)
    – White, pearl, or glitter white clay, 1/4 block
  • For a flower-ish pendant
    – Background color of choice
    – Flower color (s) of choice, 1/4 block

Tools:

  • Design cutter (snowflake, flower, etc.) smaller than 1.5×2 inches
  • Background cutter (circle, oval, rectangle, etc.) larger than 2×3 inches
  • Standard clay tools (pasta machine, blade, etc.)

Optional:

  • Your favorite decorative elements such as mica powders

For this meeting, extra are at Lori’s cost:

  • RGB blinking LEDs $.75
  • Plain LEDs $.25
  • Coin Battery $.50
  • Prices may be higher at later meetings

January 2016 Meeting: Blinking Snowflake Pendant

  • by

UPDATE 1/8/16: Lori is having back trouble and won’t be able to present her project this month, so we will switch to our planned February topic instead, and Lori will do her lighted snowflake pendant next month. So, for tomorrow’s meeting, pease bring any items you have that are broken or are “failures” so we can brainstorm together how to salvage or fix them. This will also be a good time to ask questions. Connie will do a short demo on Bottle of Hope tops. Sorry for the late notice – hope to see you tomorrow!


Happy New Year!

Our next meeting will be Saturday, January 9, 2016 from 1:30-4:30 p.m. in the Contemporary Arts Center at the fairgrounds.

Lori Luli will show us how to make a blinking snowflake pendant, incorporating LED lights for a high-tech effect. Lori will have lights available for the pendant for $4.00 – please bring cash for this, as well as for our raffle this month. This is also inchies month – bring your Winter-themed inchies to trade!

Materials:

  • Translucent  clay
  • Blue clay (or whatever color you want your snowflake on) mix your color ahead of time
  • White, pearl, and/or glitter white clay

Tools:

  • Pasta machine
  • Small snowflake or petal flower cutter Snowflake-small… guessing 1 to 1.5 inch.  Could be any 6-sided cutter.
  • Large oval cutter (or freehand the outer shape) – 4-5 inches. Could also be rectangle or trapezoid (it’s the base/background).
  • Blade
  • Other clay shaping tools as desired

December Meeting: Fun, Food & Dirty Santa!

  • by

Our next meeting will be Saturday, December 12, 2014 from 1:30-4:30 p.m. in the Contemporary Arts Center at the fairgrounds.

As we usually do for our December guild meeting, we will not have a lesson. Instead, we will bring items for show & tell, and then (optionally) swap our items in a Dirty Santa exchange. You don’t have to swap your item if you want to keep it, though! We’ll also bring goodies to snack on, and just generally have a good time of claymate fellowship.

Tom has adapted the rules of the Dirty Santa game to our purposes, so if anyone isn’t familiar with the rules, here they are:

How to Play Dirty Santa

Everyone playing the game brings a hand-crafted polymer item. Sometimes an item using a technique learned this past year or one you just enjoyed making and sharing. Please, please bring an item. It is so much more fun with many participants.

VARIATION: Since we will be showing off our gifts during Show & Tell, I will bring gift bags to mask the items for the game. Just to keep it in the spirit of Dirty Santa.

Numbers are written on pieces of paper for every gift and places them in a basket, bowl or hat.

Each person draws a number. Getting a higher number is actually better because you will have more chosen gifts to choose from.

The person with #1 picks a gift to open from the array of gift bags. The person with #2 can choose to another bag or steal the gift from #1. If a gift is stolen, the person who had it then steals from someone else or picks another gift to open. Gifts stolen cannot be directly stolen back. They must be in the pool of opened and unopened gifts for at least one turn.

The game continues like this until everyone takes a turn select an item or stealing an item. The last person to go can steal from anyone in the game or select the remaining item.

NOTICE: If the first person has not had their selection stolen during the game, they may steal a gift from anyone else. This may open a new round of stealing, but that’s the nature of Dirty Santa.

Once a gift is stolen three times, it is retired from the game.

So, let’s all come and have a great time!!!

November Meeting: Decorative Bowls

  • by

bowlsOur next meeting will be Saturday, November 14, 2015 from 1:30-4:30 p.m. in the Contemporary Arts Center at the fairgrounds.
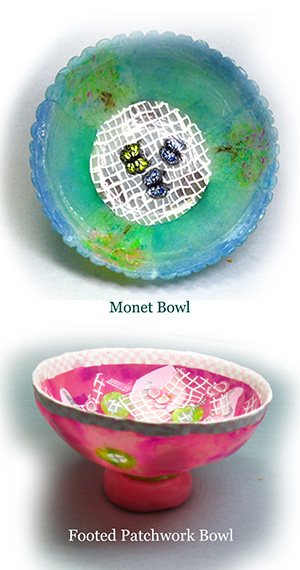
Penni Jo and Jane will present our project this month – small decorative bowls. These photos are examples of what can be done with different choices of colors, style, canes, and more.

Materials:

  • Small, oven safe bowl can be glass, Pyrex type glass, Corel® or metal

NOTE: Please bring a small bowl, as our oven does not have room for very many large bowls and they take longer. We will have a few extra little bowls. The bowl used in this tutorial was purchased at Dollar Tree. They were three for a dollar a few years back.

  • Strong polymer clay in your choice of colors – about 3 to 4 ounces, depending on size of bowl
  • 2 or 3 sheets deli or candy paper (will be provided in class if needed) 
  • Work surface and baking surface (can be the same, like a tile, etc.) 
  • Brayer or acrylic rolling rod or pasta machine
  • Sandpaper 
  • Knitting needle or Penni Jo’s Clay Tools
  • Your favorite, regular clay tools
  • Blade
  • Scissors

NOTE: If using slices of blocks, mokume gane or canes, you will only need enough extra clay for ropes to join the parts. Also if you have a Simple Slicer, it will make larger slices much easier to cut. (The bowl I brought was covered with slices from a Stroppel cane. The lines between the slices were joined with ropes of clay.)

Optional:

  • Chalks, soft paint brush about 1/4 inch wide
  • Crayons
  • Acrylic paints with brush
  • Stamps
  • Alcohol inks, alcohol in spray bottle, rubber glove, paper towels
  • Colored markers or colored pencils
  • Pearl powders
  • Glitter
  • Metallic leaves
  • Molds

October Meeting: Aztec/Tribal Designs

  • by

tribalOur next meeting will be Saturday, October 10, 2015 from 1:30-4:30 p.m. in the Contemporary Arts Center at the fairgrounds. This is our raffle month, so if you won something in the last raffle, remember to bring an item for this one! We will also be trading inchies this time, with a Fall theme.

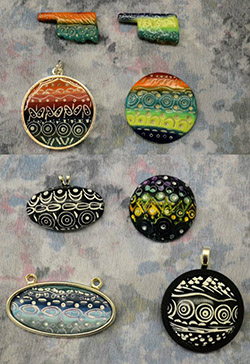
Angel Mance will present a fun demo of tribal-inspired designs at our October meeting.

Clay:

Clay colors of your choice in small amounts. We will be making cabochons from molds, or pendent shapes.  For the color blended technique bring small amounts of colors that you feel would make a nice blend. Angel got out all of her small pieces of clay and had fun using them up!

Tools:

  • Basic clay working tools
  • Pasta machine
  • Work surface
  • Paper towels & baby wipes

Findings:

  • Bezel cups or bezel findings (this is optional – Angel has quite a few of these from past retreat goody bags)

The supplies listed below are not required, but if you have them, bring them! Our group is pretty good at sharing!!

Extras:

  • White or light color craft paint
  • Paint brush
  • Tiny cutters
  • Tiny circle cutters (Myra sells a set of tiny circle cutters – she will have some available at the meeting)
  • Tiny oval cutters (many of you may have these cutters that Chris Crossland made and gave out at the 2015 retreat)
  • Miscellaneous tools or found “tools” to make patterns in clay
  • Cabochons molds or shape molds – the guild owns many wonderful molds
  • Shape cutters, cookie cutters – something that would work well for a pendant

September Meeting: Tea Light Jack-o-Lantern

  • by

jackOur September meeting will be in the Story Time Room at the Moore Public Library (225 S Howard Ave, Moore, OK) instead of our usual meeting place, due to the State Fair. For those unfamiliar with Moore, here is a map.

Connie will present our project for this month – a jack-o-lantern illuminated with an electric tea light.

Supplies

  • 2 oz. of orange clay
  • 1/4 of green or brown for stem

Tools

  • Cutting blade
  • Paper tape measure (to measure around body of pumpkin)
  • Craft knife (to cut out face)
  • Round cutter 1 3/8 or 3 1/2 mm to get clean cut on bottom
  • General clay tools (to make ridges and indentions)
  • Pasta machine to make flat sheets of clay (orange sheets you can bring already done. setting on #2 with 0 being the thickest. Needs to be wide enough to cover from top to bottom and go all the way around body)
  • Work surface
  • Magic noodles (Connie will bring these)
  • Battery tea light (available at Dollar Tree). If you want it helps you know how big around pumpkin needs to be.
  • Box to carry your project home – we have no oven this time.