Skip to content

Meeting Announcements

November Meeting: Simple Christmas Ornaments
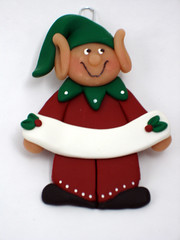
Large Elf OrnamentOur next meeting with be this Saturday November 8th. Angela will be showing us how to make two simple Christmas ornaments, perfect as quick crafty gifts for family and friends. The designs are from the Simply Ornaments CD by Maria Maestri, who has given Angela permission to teach a couple of projects to the guild.
* When: Saturday November 8, 2008, 1:00 – 4:00 p.m.
* Where: The new Hobby Lobby in Norman, 2417 W. Main, Norman, OK. (The classroom is up front, near the check out stands. Go right after entering & it’s the first door on the right.)
* What To Bring:
* Polymer clay in your desired colors. For the sample ornaments, Angela used about 1 package of red; 1/2 package each of green, white and beige/flesh; and a small amount of black.
* Your favorite clay tools, such as a clay blade and needle tool. While none of the projects requires a pasta machine, feel free to bring one if you want it for conditioning or just to have handy.
* Optional items (Angela will have these if you don’t): Metal paper clips (1 per ornament); wire cutters; rose-colored chalks or blush with an applicator (brush, finger, etc); white acrylic paint with paintbrush; black Prismacolor marker.
Mouse OrnamentAlso, we will be having our raffle this month. The winners of the last raffle should bring something for this months raffle. The winners were Lee Ann and Sue. So everyone bring something wonderful so we can purchase more books!
Meeting announcement written by April G.

October Meeting: Multi-layer Pendent/Pin

10070010.jpgThe Saturday October 11th meeting is going to be another great one! Jane Linn will be showing us translucent layering techniques similar to those of Kathleen Dustin, the amazing polymer clay artist. Jane has included some gorgeous examples of her work using these techniques. Come one and all and participate in this exciting meeting!
* When: Saturday, October 11, 2008, 1:00 – 4:00 p.m.
* Where: The new Hobby Lobby in Norman, 2417 W. Main, Norman, OK. (The classroom is up front, near the check out stands. Go right after entering & it’s the first door on the right.)
* What To Bring:
* Clear Liquid polymer clay
* Clay for background-approx. 1/2 block (1 oz.) each-your choice of colors. Jane encourages everyone to chose 2 colors-maybe a light and dark
* Pearl powders and/or Acrylic paints-your choice of colors
* Metal leaf/glitter-optional
* Canes-optional-(it looks like Kathleen Dustin used a number of canes using transparent clay and one color on her work, if your’e going for that look)
* Wire for bail -optional, if making pendent and prefer a bail to a cut hole
* 2 clean ceramic tiles
* Small stamps and stamp pads Penni Jo will be bringing some small face stamps that we can purchase (they are wonderful!). Except for the very smallest size, the stamps are not mounted so they easily stamp a curve (bead,etc.) *
* Heat gun — I think there will be enough people who already have one who are willing to share. However, Hobby Lobby has the heat gun on sale this week for $10, if you do want one *
* Flat brush-approx to inch optional, if rather use your finger to spread
* Sharpie pen-any size, any color. If you don’t have one we can share *
* Scissors
* Work surface
* Brayer *
* Exacto knife
* Pasta machine *
* Paper towels and/or wet wipes for clean up
* Wire cutter-optional-if using a wire bail in pendant
* Note: If you do not have the starred items, do not feel you have to buy them for this meeting. The guild and members have them and are happy to share.
10070007.jpg 10070008.jpg
Reminder: Our swap theme this month is Harvest. To participate, bring one item. In exchange, you’ll receive one item from another swap participant.

September Meeting: Mokume Gane

This month, Nance Ross will be teaching a Mokume Gane project. Here’s a summary from Nance:
Most of our Guild members have already done some makume gane projects in the past, so for the benefit of new members, we will do a basic stack of thin layers of clay, do the usual holes and/or texturizing, and add a few inclusions. The end result is to make some slices that can be used to cover an altoid tin, a ball of scrap to make a fan pull, or pendant, or other useful and attractive project.
This is planned to be an interactive exchange of ideas on what to add, what products work well with clay (inks, foils, leaf s of various kinds, paints, inclusions etc.) and ways in which to add textures and depth to impressions in the brick prior to stacking. Ways to use the patterns produced on useful and decorative item will also be discussed.
* When: Saturday, September 13, 2008, 1:00 – 4:00 p.m.
* Where: The new Hobby Lobby in Norman, 2417 W. Main, Norman, OK. (The classroom is up front, near the check out stands. Go right after entering & it’s the first door on the right.)
* What To Bring:
* Your ideas to share.
* The usual rollers, slicers, work space, plus three or four of your favorite colors of clay that work well together, pre-rolled to the desired thickness (new members will have the chance to roll their own at the meeting, if you are not sure how to do it for Makume Gane), and any product or inclusion you wish to use, knitting needles or other implements for making holes through the stack of clay, and any example you wish to share of completed projects done with makume gane as a start to creating the project.
* Also might be useful to bring materials for taking notes, as this should be a meeting packed with lots of ideas…..just in time for making Christmas gifts!
Reminder: We will be having a raffle this coming meeting. The prizes are to be provided by Angela, Lee Ann, and Shirley. Members will purchase tickets and place their tickets in a container for the prizes they would like to win. The winners take home the prize and are to provide a prize the next time we have a raffle (every other month).

August Meeting: Ink Jet Transfers

Ink Jet Transfer Sample by ShirleyShirley will be teaching August’s lesson on **Ink Jet Transfers**. We will be transferring two ink-jet-printed images to polymer clay, then creating two small “tiles” which can be used in elasticized tile bracelets. Each tile will use a different technique, resulting in a slightly different look. One technique will result in a transfer with bright, clear colors, and the other will yield an image that is a bit yellowed, giving it an aged look. There are many types of images that would make a nice bracelet: copyright-free artistic designs; old prints or drawings; photos of children, grandchildren, or ancestors; fragments of maps; and vacation mementos. Lots of colorful design images will be provided for you to use, but for those who wish to use their own images, an e-mail message outlining options will follow.
– **When:** Saturday, August 9, 2008, 1:00 – 4:00 p.m.
– **Where:** The new Hobby Lobby in Norman, 2417 W. Main, Norman, OK. (The classroom is up front, near the check out stands. Go right after entering & it’s the first door on the right.)
– **What to Bring:**
– One-half ounce of white polymer clay (Shirley has used Kato and Premo with good results.)
– One-half ounce of translucent polymer clay (Will be rolled to the thinnest setting, so if you have a favorite brand that works well at this thickness, do use it.)
– One pkg. of black polymer clay
– One-half ounce of scrap clay
– Liquid polymer clay
– Elasticized bead cord (black)
– Brass tube, knitting needle, or some device about 1/8 inch diameter, or wide enough to measure a space through your tile big enough to accommodate a knot in your bead cord.
– Clay blade
– Pasta machine
– Needle tool
– Scissors for cutting thin slabs of cured clay
– Bone folder, stiff credit card, or plastic spoon for burnishing image on clay
– Tile(s) for baking surface
– Waxed paper, baby wipes, etc. for clean work surface
– Also helpful: Grid paper or a gridded cutting mat
Note on clay brands: Since the process involves several steps of re-baking, Shirley recommends using only clays with similar baking temperatures on one tile. Additional materials needed to finish the bracelet at home will be listed in the instruction handout.
**REMINDER** – We will be having a swap this meeting. Since our group seems to have a lot of August “babies,” our swap theme is birthdays. Think cake, babies, age, party hats, or any other festive birthday-themed items. To participate, bring one item. In exchange, you’ll receive one item from another swap participant.

July Meeting: All About Polymer Clay Beads

This month is an exciting learning opportunity. **We will be sharing tips and techniques on creating polymer clay beads.**
Thumbnail image for bonebeads.jpg
Many members have expressed an interest in learning how to make polymer clay beads. There are so many different ways and kinds of beads that we thought it was time to have a meeting where we can all share tips on what works, what doesn’t work, how to operate some of the bead making rollers and anything else that comes up about polymer clay beads.
If you don’t have any idea how to do any of these things, this would be a wonderful opportunity to come learn, play and ask any questions you may have, I’m sure there will be plenty of members that can share experiences.
– **When: Saturday, July 12, 2008, 1:00 – 4:00 p.m.**
– **Where: The new Hobby Lobby in Norman, 2417 W. Main, Norman, OK.** (The classroom is up front, near the check out stands. Go right after entering & it’s the first door on the right.)
– **What to Bring:**
– Polymer Clay: Bring whatever polymer clay you would like to use in attempting to make polymer clay beads. Some clays will lend themselves better to certain techniques and others are better for other techniques. The main thing is to come, experiment and share and learn. *On a personal note, I’ve found that Sculpy III tends to be to soft of a clay for any beads that I try to make, so tend to stick to using Premo, Fimo and Kato clay’s.*
– Wax Paper or other clean working surface.
– A Bead Baking Tray if you have one – no need to go out and buy one just for this lesson, as there will be a couple available.
– Any Bead Rollers that you may have – no need to go out and buy them just for this lesson, there should be plenty to share.
– ***Optional:***
– Pasta Machine (for conditioning clay)
– Clay blade
– Any texture or detail type tools that you may want to experiment with
– Canes that you may want to apply to any beads
– Latex or non Latex, thin gloves (if you want to try to eliminate fingerprints)
If you have made any Polymer Clay Beads, we would love for you to bring them to the meeting and show what you have made. On the same note, if you have found any books/resources about polymer clay beads, we would love for you to either bring them or the names/locations to share.
**REMINDER** – We will be having a raffle this coming meeting. **The prizes this meeting are to be provided by Penni Jo and April S.** If anyone else would like to contribute to the prizes, feel free to. Members will purchase tickets and place their tickets in a container for the prizes they would like to win. The winners take home the prize and are to provide a prize the next time we have a raffle (every other month).
We hope to see you there!

June Meeting: Rubber Stamped Coasters

Swirly Bird Coaster 2 by CraftyGoat
This month, Angela Mabray will be giving tips on using rubber stamps with polymer clay, then showing how to make a **Rubber Stamped Coaster**.
* When: Saturday, June 14, 2008, 1:00 – 4:00 p.m.
* Where: The new Hobby Lobby in Norman, 2417 W. Main, Norman, OK. (The classroom is up front, near the check out stands. Go right after entering & it’s the first door on the right.)
* What to Bring:
* Polymer Clay: Our main project will use about 1/2 block of white clay (makes one 4″ coaster). Angela will be discussing various techniques, so bring along extra clay if you want to make other coasters.
* Rubber Stamps: Angela will have lots of stamps available, but feel free to bring a few favorites to use and share. Deeply cut stamps tend to work best with polymer clay.
* Cork Coasters: You can buy pre-cut round or square cork coasters at Hobby Lobby (a package of 6 costs $2.77). These are usually on the same aisle as bulletin boards & other cork boards. If you prefer, you can buy the rolls of cork and cut them down to size.
* Pasta Machine
* Glue: Super glue or Sobo
* Work surface and baking tile (at least 4″ x 4″)
* Clay blade
* Scissors
* StazOn ink pad, chalks, stamp cleaner: Angela will have some available to share if you don’t have these
* Optional (for projects other than the coaster pictured above): Kato or TLS liquid clay, alcohol inks, black acrylic paint, colorful acrylic paint
Swap: Don’t forget — this month is our first swap. Bring one item to swap that fits this month’s theme, which is **floral**

May Meeting: Faux Zebrawood Inro

Faux Zebrawood Inro CloseupThis month, Penni Jo Couch will be showing us how to make a **Faux Zebrawood Inro** using polymer clay.
* When: Saturday, May 10, 2008, 1:00 – 4:00 p.m.
* Where: The new Hobby Lobby in Norman, 2417 W. Main, Norman, OK. (The classroom is up front, near the check stands. Go right after entering & it’s the first door on the right.)
* What to Bring:
* Strong Polymer Clay: **Please** have your clay conditioned before class and use only a strong brand of clay for this project. The Faux Zebrawood inro pictured uses 1/2 block gold, 1/4 block of dark brown and 1/2 block of black. For the inside, metallic clay is nice as it is bright when the box is opened. Gold may be very soft, so you may want to mix it 50/50 with translucent for the inside.
* Paper, scotch tape, scissors
* Cord: like 1 mm or 2 mm rolled leather cord or other heavy cord
approx. 1/16” in diameter. The drill bit will need to be about the same diameter as your cord.
* Hand drill with 1/16” drill bit in a handle.
* Blades: Exacto knife with new, sharp blade. Rigid tissue blade or razor blade for straight cuts.
* Pasta machine or Acrylic roller and spacers
* Deli paper or wax paper: The deli or wax paper is needed to prevent the clay from sticking to your work surface.
* Poly-fill, small amount to stuff inside the inro.
* Liquid clay – Kato or TLS.
* Release Agent: Baby powder or cornstarch and a small brush for applying OR Kato Repel Gel.
* Brushes: Small brush dedicated to liquid polymer clay. (No need to clean it out. It can be stored in a baggie between uses.)
* Thin, stiff wire or needle to make holes in the beads.
* Baking Surface – Small (4” by 4” or 2” by 2”) tile or heavy cardboard. Remember, we share the ovens at guild so bring something just larger than your project so that many can be put into the oven at the same time.
* Varnish – Future or other polymer clay friendly varnish.
* Optional Items: Extruder to make the ropes that go around the box, under the lid and above the bottom. Closure if you wish for the necklace to separate in the back.
* Optional Embellishments: Canes – Assortment of canes, Pearl Ex or other mica powders, Mokume Gane slices, or other faux finishes.
As this is a fairly involved class with specialized supplies, Penni Jo has put together a kit that has some of the necessary items for $1.00 each. She needs to know in advance which members want the kits so she can have these prepared. **Please reserve a kit via our mailing list.** If you’re not on the mailing list, you can also use contact form.
**Inro Kit Contents** (available from Penni Jo for $1):
* 1 1/4” tall PVC pipe form with paper taped around it, bottom clipped and ready to use.
* 1/4” Paper strip for cut line
* Small piece of paper for patterns
* Tiny bag of baby powder for release agent
* Tiny bag of liquid Kato Medium®
* Two sheets of Deli Paper
* Small amount of Fiber-fil®
* Toothpicks, two cut in half, ready to use
* Full color lesson with pictures.
If you would like a sneak peak at what we’ll be doing, check out these PDFs from Penni Jo:
* InroMaterialsList.pdf
* InroClassInstructions.pdf
It’s going to be an exciting meeting — we hope to see you there!